Last Updated: 14 July 2026
Surya Namaskar, commonly known as Sun Salutation, is one of the most well-known yoga practices and has been followed for generations as part of a healthy daily routine. Rather than being a single yoga pose, it is a flowing sequence of 12 yoga postures (asanas) performed in coordination with the breath. Each movement transitions smoothly into the next, creating a balanced practice that engages the entire body.
Whether you are new to yoga or have been practising for years, Surya Namaskar is a simple yet effective way to improve flexibility, build strength, increase energy, and calm the mind. Because it combines stretching, strengthening, controlled breathing, and mindful movement, many people include it in their morning routine to start the day feeling refreshed and focused.
In this guide, you’ll learn what Surya Namaskar is, why it is considered a complete yoga sequence, how to prepare before practising, the 12 steps of Surya Namaskar, its potential benefits, and important safety tips for beginners.
What Is Surya Namaskar?
Surya Namaskar is a traditional sequence of twelve yoga postures performed in a continuous flow while synchronising each movement with the breath. The Sanskrit word “Surya” means Sun, and “Namaskar” means salutation or greeting. Together, the term translates to “Salutation to the Sun.”
In the traditional yogic system, the Sun is regarded as a symbol of energy, vitality, and life. Practising Surya Namaskar is therefore not only a physical exercise but also a mindful practice that encourages awareness of the breath and movement.
Each round includes forward bends, backward bends, lunges, and strengthening poses that work together to stretch and activate different muscle groups. As a result, Surya Namaskar provides a balanced combination of flexibility, stability, mobility, and coordination in a single sequence.
Today, it is practised by people of all ages around the world as part of yoga sessions, fitness routines, and general wellness practices.
Why Is Surya Namaskar Considered a Complete Yoga Sequence?
Surya Namaskar is often called a complete yoga sequence because it combines multiple yoga postures into one continuous flow. In a single round, the body moves through standing, forward-bending, backward-bending, balancing, and strengthening positions.
Unlike practising individual asanas separately, Surya Namaskar allows each posture to flow naturally into the next while coordinating movement with the breath. This balanced combination of movement and mindful breathing makes it an efficient practice that engages the entire body in just a few minutes.
Things to Know Before Practising Surya Namaskar
Before you begin practising Surya Namaskar, taking a few simple precautions can make your practice safer, more comfortable, and more effective. Whether you’re a beginner or returning to yoga after a break, these guidelines will help you get started on the right note.
1. Practice on an Empty Stomach
For the best experience, practise Surya Namaskar on an empty stomach. If you’ve had a meal, wait at least 2-3 hours before beginning. A light stomach allows your body to move more comfortably, especially during forward bends and twists.
2. Choose the Right Time
Traditionally, Surya Namaskar is practised early in the morning, preferably around sunrise, when the body and mind feel fresh. Morning practice can help awaken the body, improve focus, and set a positive tone for the day.
However, if mornings aren’t possible, you can also practise later in the day, provided your stomach is empty and you feel comfortable.
3. Wear Comfortable Clothing
Choose loose or stretchable clothes that allow you to move freely without restricting your movements. Comfortable clothing makes it easier to transition smoothly from one posture to the next.
4. Use a Yoga Mat
Always practise on a yoga mat or another non-slip surface, such as a thick exercise mat or carpet. Avoid practising directly on hard or slippery floors, as this may reduce stability and increase the risk of slipping.
5. Start with a Gentle Warm-Up
If your body feels stiff, spend a few minutes warming up before beginning. Gentle neck rolls, shoulder rotations, wrist and ankle movements, or light stretching can prepare your muscles and joints for the sequence.
6. Focus on Your Breath
Breathing is an essential part of Surya Namaskar. Try to synchronise each movement with your breath instead of rushing through the poses. Slow, steady breathing helps you move with better control and encourages a more mindful practice.
7. Practise at Your Own Pace
There’s no need to perform every posture perfectly on your first day. Move only as far as your body allows, and avoid forcing any stretch or position. With regular practice, flexibility, strength, and balance naturally improve over time.
Beginner’s Tip: If you’re just starting, begin with 3-5 rounds of Surya Namaskar and focus on learning the correct technique. As your stamina and confidence improve, you can gradually increase the number of rounds.
What Are the 12 Steps of Surya Namaskar?
Surya Namaskar consists of 12 yoga postures performed in a smooth, continuous sequence. Each posture is coordinated with a specific breathing pattern, allowing the body and breath to move together.
Take your time with each step, maintain steady breathing, and avoid rushing through the sequence. The goal is not speed but mindful movement with proper alignment.
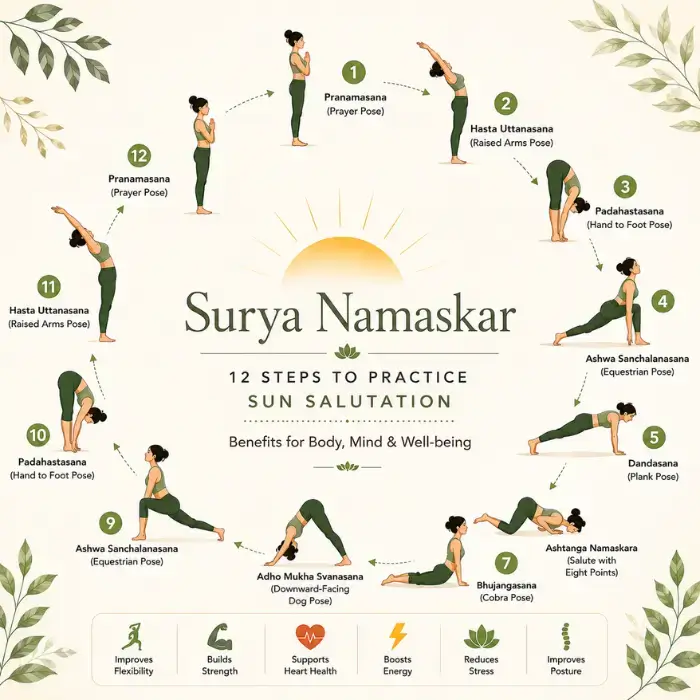
Step 1: Pranamasana (Prayer Pose)
Stand upright with your feet together or hip-width apart if that feels more comfortable. Distribute your body weight evenly on both feet and keep your spine straight.
As you breathe out, bring your palms together in front of your chest in a prayer position. Relax your shoulders, soften your facial muscles, and take a moment to settle your mind before beginning the sequence.
Step 2: Hasta Uttanasana (Raised Arms Pose)
As you breathe in, raise both arms overhead with your palms facing each other. Gently lift your chest and bend slightly backwards from the upper back while keeping your arms straight.
Avoid collapsing your lower back. Instead, lengthen through the spine and create a comfortable stretch across the chest, shoulders, and abdomen.
Step 3: Padahastasana (Hand-to-Foot Pose)
As you breathe out, bend forward from your hips and bring your hands toward the floor beside your feet.
If your palms don’t comfortably reach the floor, simply place them on your shins, ankles, or wherever feels comfortable. Try to keep your knees as straight as possible without straining, and allow your head and neck to relax.
Step 4: Ashwa Sanchalanasana (Equestrian Pose)
As you breathe in, take your right leg back as far as comfortable while keeping your left foot between your hands.
Lower your right knee to the mat, lift your chest, and look gently forward or slightly upward. Keep your left knee aligned over your left ankle to maintain stability and balance.
Step 5: Dandasana (Plank Pose)
As you breathe in, take your left foot back to meet the right, bringing your body into a straight plank position.
Keep your shoulders directly above your wrists, engage your core muscles, and maintain a straight line from your head to your heels. Avoid letting your hips sag or rise too high. This posture helps build strength in the arms, shoulders, core, and legs while preparing the body for the next movement.
Step 6: Ashtanga Namaskara (Salute with Eight Points)
As you breathe out, gently lower your knees to the mat. Then lower your chest and chin towards the floor while keeping your hips slightly raised.
In this posture, eight points of the body touch the ground. Both feet, both knees, both hands, the chest, and the chin. Keep your elbows close to your body and avoid dropping your abdomen completely onto the mat.
Step 7: Bhujangasana (Cobra Pose)
As you breathe in, slide your body forward and press your palms firmly into the mat. Slowly lift your chest while keeping your elbows slightly bent and close to your sides.
Roll your shoulders back, open your chest, and look forward or slightly upward without straining your neck. Keep your lower body relaxed on the mat and avoid forcing the backbend. This posture gently stretches the front of the body while strengthening the back muscles.
Step 8: Adho Mukha Svanasana (Downward-Facing Dog Pose)
As you breathe out, lift your hips upward and backward, forming an inverted “V” shape with your body.
Press your palms firmly into the mat and gradually straighten your arms and legs as much as your flexibility allows. Let your head relax naturally between your arms, and gently move your heels towards the floor without forcing them to touch.
This posture stretches the hamstrings, calves, shoulders, and spine while improving overall body awareness.
Step 9: Ashwa Sanchalanasana (Equestrian Pose)
As you breathe in, bring your left foot forward between your hands. Lower your right knee to the floor if needed.
Lift your chest, lengthen your spine, and look gently ahead or slightly upward. This posture mirrors Step 4, helping maintain balance on both sides of the body.
Step 10: Padahastasana (Hand-to-Foot Pose)
As you breathe out, bring your right foot forward beside your left foot and fold your upper body over your legs.
Keep your hands beside your feet, on your ankles, or wherever feels comfortable. Relax your neck and avoid forcing your forehead towards your knees. With regular practice, flexibility will gradually improve.
Step 11: Hasta Uttanasana (Raised Arms Pose)
As you breathe in, slowly rise to a standing position by lifting your upper body.
Raise both arms overhead and gently arch your upper body backwards while keeping your spine long and your chest open. Avoid excessive bending from the lower back. Instead, create the stretch evenly through the entire spine.
Step 12: Pranamasana (Prayer Pose)
As you breathe out, straighten your body and return to an upright standing position.
Bring your palms together in front of your chest in the prayer position, relax your shoulders, and take a few slow, natural breaths. Pause for a moment to notice how your body feels before beginning another round or ending your practice.
Note: Completing all 12 postures is considered one round of Surya Namaskar. If you begin by stepping the right leg back in Step 4, start the next round by stepping the left leg back. Alternating the leading leg helps maintain balance and ensures both sides of the body are worked equally.
Benefits of Surya Namaskar
Surya Namaskar is more than just a sequence of yoga postures. When practised regularly with proper technique and breathing, it offers a combination of physical, mental, and overall wellness benefits. While individual results may vary, consistent practice may support the following:
1. Improves Flexibility and Mobility
The continuous flow of forward bends, backward bends, and stretches helps improve flexibility in the spine, shoulders, hips, hamstrings, and leg muscles. Over time, regular practice may also increase joint mobility and make everyday movements feel easier.
2. Builds Strength Throughout the Body
Several postures in Surya Namaskar engage the arms, shoulders, chest, back, abdomen, and legs. As these muscle groups work together, they gradually become stronger, helping improve overall stability and body control.
3. Supports Heart Health
When practised at a steady pace, Surya Namaskar keeps the body moving continuously, which may help improve blood circulation and contribute to overall cardiovascular fitness as part of an active lifestyle.
4. May Help with Healthy Weight Management
Performing multiple rounds of Surya Namaskar increases physical activity and can help burn calories. Combined with a balanced diet and other healthy habits, it may support healthy weight management.
5. Encourages Better Posture
Many people spend long hours sitting at desks or looking at screens, which can contribute to poor posture. The stretching and strengthening movements in Surya Namaskar help improve body awareness and support better posture over time.
6. Supports Healthy Digestion
The gentle compression and stretching of the abdominal region during different postures may help stimulate the digestive organs. When combined with a healthy lifestyle, regular practice may support comfortable digestion and reduce feelings of bloating.
7. Helps Reduce Stress and Improve Focus
One of the unique aspects of Surya Namaskar is the coordination of movement with breathing. This mindful rhythm encourages relaxation, helping reduce everyday stress while improving concentration and mental clarity.
8. Increases Energy Levels
Many people find that practising Surya Namaskar in the morning leaves them feeling refreshed and energised. The combination of movement, stretching, and deep breathing can help reduce stiffness and prepare the body for the day ahead.
How Many Rounds of Surya Namaskar Should You Do?
The ideal number of Surya Namaskar rounds depends on your fitness level, experience, and personal goals. If you’re a beginner, it’s best to focus on learning the correct technique rather than completing a large number of rounds.
As a general guideline:
- Beginners: Start with 3-5 rounds at a comfortable pace.
- Intermediate practitioners: Practise 6-12 rounds once you’re familiar with the sequence.
- Experienced practitioners: You can gradually increase the number of rounds based on your fitness level and under proper guidance, if needed.
Listen to your body and avoid pushing yourself beyond your comfort level. It’s better to practise a few rounds with proper posture and controlled breathing than to complete many rounds with incorrect form.
Remember, consistency is more important than the number of rounds. Even a few minutes of regular practice can contribute to your overall health and well-being over time.
Who Should Avoid or Modify Surya Namaskar?
Although Surya Namaskar is generally safe for many healthy individuals, it may not be suitable for everyone. It’s best to consult a healthcare provider or a qualified yoga instructor before practising if you:
- Are pregnant or have recently given birth.
- Have high blood pressure or certain heart conditions.
- Have a recent back, neck, shoulder, knee, or wrist injury.
- Have undergone recent surgery.
- Experience severe dizziness, balance problems, or any medical condition that may affect your ability to exercise safely.
If you’re new to yoga or recovering from an injury, start slowly and modify the postures as needed under professional guidance.
Tips for Beginners
If you’re new to Surya Namaskar, don’t worry about performing every posture perfectly on your first day. The key is to learn the correct technique and practise consistently.
Here are a few simple tips to help you get started:
- Begin with 3-5 rounds and increase the number gradually as your stamina improves.
- Move slowly and focus on correct posture rather than speed.
- Coordinate each movement with your breathing.
- Wear comfortable clothing and practise on a non-slip yoga mat.
- Stop if you feel pain, dizziness, or unusual discomfort.
- If you have a medical condition or injury, consult a healthcare professional or a qualified yoga instructor before practising.
Final Thoughts
Surya Namaskar is a simple yet effective yoga practice that brings together movement, breathing, and mindfulness in a single sequence. Whether your goal is to improve flexibility, build strength, increase energy, or simply make time for self-care, practising it regularly can be a valuable addition to a healthy lifestyle.
Remember that progress doesn’t happen overnight. Start at a pace that feels comfortable, pay attention to your body’s signals, and focus on consistency rather than perfection. With regular practice and the right technique, Surya Namaskar can become a rewarding part of your daily wellness routine.
Disclaimer
This article is intended for informational and educational purposes only and should not be considered medical advice. Always consult a qualified healthcare professional or certified yoga instructor before starting any new exercise or wellness routine, especially if you have an existing medical condition, are pregnant, or are recovering from an injury.
References
- Journal of Ayurveda and Integrative Medicine – Insights on Surya Namaskar: From Its Origin to Application Towards Health.
- Journal of Bodywork and Movement Therapies – Acute Effects of Surya Namaskar on the Cardiovascular and Metabolic System.
- International Journal of Yoga – Surya Namaskar: As an Alternative for Aerobic Fitness.
- AYUSH Research Portal – Energy Cost and Cardiorespiratory Changes During the Practice of Surya Namaskar.
- Yoga Journal – Sun Salutation (Surya Namaskar): How to Practice Safely and Correctly.

A natural living enthusiast passionate about Ayurveda and holistic wellness. Through HealthBooti, she shares well-researched, practical health tips and lifestyle guidance to help individuals and families embrace healthier habits naturally. Her mission is to make natural healing simple, safe, and accessible for everyday life.